



Full Instruction Video:
Subscribe to our channel so you don’t miss out on new content, instructions, and tips.
Disclaimer: The instructions in this video are intended as a general guideline. The use of FinalPutt products is at your own risk. FinalPutt is not liable for any injury, damage, or other consequences resulting from improper, unsafe, or unintended use of the product.
Want the Full Video Training Guide?
👉 Get The Program Here
How to Use the Swing Hinge to Perfect Your Wrist Position at the Top of Your Backswing: A Complete Guide
The Swing Hinge is a golf training aid that clips onto your club and gives you instant feedback on your wrist hinge at the top of your backswing. If your wrists are not set correctly at the top, everything that follows is a compensation. The downswing, the impact position, the ball flight, all of it is affected by what happens at the top. The Swing Hinge tells you immediately whether your wrist position is correct or not, on every single swing.
Here is the principle that makes this tool so powerful: the top decides everything. The position of your wrists at the top of your backswing determines your swing plane, your lag, your clubface angle at impact, and ultimately where the ball goes. Most golfers have never received feedback on this position because it happens behind them and above them where they cannot see it. The Swing Hinge solves that by giving you instant tactile feedback at the exact moment your wrists set at the top. If the hinge contacts your wrist, your position is correct. If it misses, your position is off. Simple. Immediate. No guessing.
With just a few minutes of practice a day, you will train a consistent wrist hinge that builds lag, improves clubface control, and creates a repeatable backswing position that sets up everything else in your swing. This guide will walk you through everything, how the product works, how to set it up, how to train with it at every level, what mistakes to avoid, and how to get the most out of every session.
What Is the Swing Hinge and How Does It Improve Your Golf Swing?
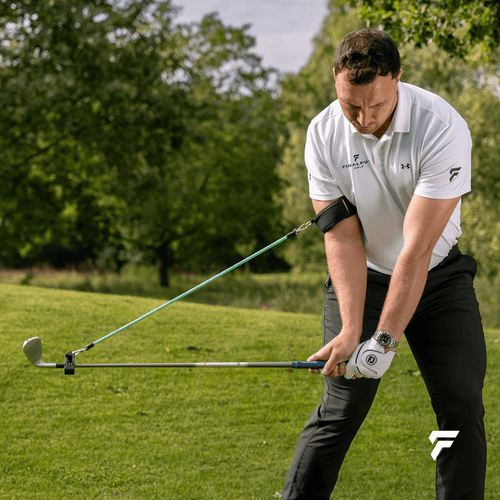
The Swing Hinge is a small device that clips onto your club shaft near the grip. It has a hinged arm that extends toward your lead wrist. When you swing the club to the top of your backswing, the arm either contacts your wrist or it does not. That contact is your feedback.
Why Wrist Position at the Top Matters The top of the backswing is the most important checkpoint in the entire golf swing. Everything that happens before it is preparation. Everything that happens after it is a result of the position you set. If your wrists are hinged correctly at the top, the club is on plane, the face is square, and the downswing can happen naturally without compensations. If your wrists are under-hinged, over-hinged, cupped, or bowed incorrectly, the club is off plane and your body has to make emergency corrections on the way down. Those corrections are what cause slices, hooks, thin shots, fat shots, and inconsistency.
How the Swing Hinge Gives You Feedback The hinged arm is calibrated so that when your lead wrist reaches the correct hinge angle at the top, the arm makes contact with your wrist. You feel a light tap or touch. That touch means your position is correct.
If the arm does not contact your wrist at the top, your hinge angle is off. Either you have not hinged enough, you have hinged too much, or your wrist is in the wrong position. The absence of contact is the feedback telling you to adjust.
This is a simple yes or no system. Contact means correct. No contact means incorrect. There is no ambiguity. You know on every single swing whether your top position is right or wrong.
Why Feedback at the Top is Better Than Feedback at Impact Many golf training aids give you feedback at impact. That is useful, but it is late. By the time you reach impact, the damage is already done. The Swing Hinge gives you feedback at the top, before the downswing even starts. This means you can fix the root cause instead of chasing the symptoms. Fix the top and the rest of the swing follows naturally.
How to Set Up the Swing Hinge
Correct setup ensures accurate feedback on every swing.
Step 1, Clip the Swing Hinge onto Your Club Attach the Swing Hinge to the shaft of your club, near the grip area. Make sure it is secure and does not slide or rotate during the swing. The hinged arm should extend toward your lead wrist (left wrist for right-handed golfers).
Step 2, Position the Hinged Arm Adjust the arm so that it is calibrated to contact your lead wrist when your wrist is in the correct hinge position at the top. Take a few slow backswings to the top and check whether the arm reaches your wrist. If it does not quite reach or if it contacts too aggressively, reposition the device slightly until the feedback feels clear and accurate.
Step 3, Take Slow Practice Swings Before hitting any balls, take several slow backswings to the top. Focus on the moment of contact. Feel the arm touch your wrist when the position is correct. Notice when it misses. This calibrates your awareness so you know what correct feels like before you start hitting.
Step 4, Grip and Address the Ball Normally The Swing Hinge does not require any changes to your grip, stance, or posture. It clips onto the club and works within your existing swing. The only difference is that now you have a checkpoint at the top that tells you whether your wrists are set correctly.
Quick Setup Checklist:
- Swing Hinge clipped securely onto the shaft near the grip
- Hinged arm positioned toward your lead wrist
- Arm calibrated to contact your wrist at the correct hinge angle
- Slow practice backswings taken to confirm accurate feedback
- Normal grip, stance, and posture at address
How to Train With the Swing Hinge for Maximum Results
Phase 1: Beginner, Feeling the Correct Top Position (Week 1-2)
The goal in the first phase is to learn what the correct wrist hinge at the top feels like. Most golfers have never received feedback on this position, so the sensation will be completely new.
Start with slow half and three-quarter backswings using a mid-iron. Do not worry about hitting balls yet. Just swing to the top slowly and feel whether the hinged arm contacts your wrist. If it does, hold that position for a second. Feel it. Memorize it. That is where your wrists need to be on every swing.
If the arm misses, adjust your wrist hinge. Try hinging more. Try hinging less. Experiment until you find the position where the arm makes clean contact. Once you find it, repeat that motion 10-15 times in a row to start building the pattern.
Start hitting balls with slow, controlled swings. Once you can consistently feel the contact at the top, begin hitting balls. Use a wedge or short iron. Swing at 60-70% speed. Focus on getting the contact at the top on every swing and then letting the downswing happen naturally from that correct position.
Hit 20-30 balls per session. After each swing, register whether the arm contacted your wrist or not. If it did, notice the ball flight. You should see straighter, more consistent shots because the club is arriving from the correct position.
Remove the Swing Hinge and hit 10 balls. Can you feel the correct top position without the feedback? Can you recreate the hinge angle from memory? This is where the internal awareness starts building.
Phase 2: Intermediate, Building Consistency at Speed (Week 3-4)
Now you start increasing swing speed while maintaining the correct wrist position at the top.
Move to full swings with mid-irons and long irons. As the swing gets faster, it becomes harder to maintain the correct wrist hinge at the top. The Swing Hinge will tell you immediately if you are losing the position as you add speed. Many golfers hinge correctly at slow speed but under-hinge or over-hinge when they swing harder. The feedback catches this instantly.
Pay attention to your ball flight. With a correct wrist position at the top, your ball flight should become more consistent. The club is on plane. The face is controlled. You should see tighter dispersion and more predictable trajectory on every club.
Increase to 40-50 balls per session. Alternate between Swing Hinge on and off every 10 balls. The on/off cycle is critical for building muscle memory. You want your body to maintain the correct wrist hinge automatically, without needing the feedback device on the club.
Add driver practice. The driver is where an incorrect top position causes the most visible damage. A poor wrist hinge at the top with a driver can add 30 yards of slice. Clip the Swing Hinge onto your driver and train the correct position at full speed.
Phase 3: Advanced, Making the Correct Top Position Automatic (Week 5+)
By now, the correct wrist hinge should start to feel natural. Your body is learning the position.
Use the Swing Hinge as a warm-up checkpoint. Clip it on for the first 10-15 balls of every practice session to verify your wrist position is correct before training without it. Think of it as a calibration tool that confirms your top position is where it needs to be.
Use it after time off. If you have not played or practiced for a week or more, the Swing Hinge is the fastest way to recalibrate your backswing. A few swings with the feedback resets the correct position immediately.
Test yourself regularly. Hit 20 balls without the Swing Hinge. Film your swing from down the line. Is your wrist position consistent at the top? If it looks correct and your ball flight confirms it, the muscle memory is locked in. If the position is drifting, clip the device back on and recalibrate.
Common Mistakes to Avoid When Using the Swing Hinge
Mistake 1: Rushing through the top The Swing Hinge gives feedback at the top of the backswing. If you rush through the transition, you may not register the contact clearly. Slow down your transition in the first few sessions so you can clearly feel whether the arm touches your wrist or not.
Mistake 2: Only checking the hinge, not the ball flight The wrist contact is the feedback. The ball flight is the result. Always connect the two. When the arm contacts your wrist and the ball flies straight, you know both the position and the outcome are correct. If the arm contacts but the ball still curves, check your setup and alignment.
Mistake 3: Swinging too fast too soon Start at 60-70% speed. Build up to full speed over several sessions. Your body needs time to associate the correct top position with the feedback. If you swing at full speed from the start, the feedback is harder to register and the learning is slower.
Mistake 4: Not experimenting with wrist adjustments When the arm misses your wrist, do not just swing again the same way. Adjust. Hinge more. Hinge less. Change the angle. Find the position where the arm makes clean contact. The experimentation is where the learning happens.
Mistake 5: Never removing it from the club The Swing Hinge is a training tool, not a permanent attachment. You need to train without it to develop internal awareness of your wrist position at the top. Alternate on and off during every session. The goal is to feel the correct top position without needing the feedback.
Mistake 6: Ignoring the backswing and only caring about impact Many golfers are obsessed with impact position and ignore the backswing. The Swing Hinge exists because the top decides everything. If you are correct at the top, impact takes care of itself. Trust the process. Fix the top and the rest follows.
What Golf Swing Faults Does the Swing Hinge Fix?
The Slice (Fixed at the Source)
Most slicers have an incorrect wrist position at the top that leaves the clubface open. The downswing then has to compensate, and the compensation usually makes things worse. The Swing Hinge trains the correct wrist hinge at the top so the face is square before the downswing even begins. Fix the top and the slice disappears because the cause of the slice disappears.
Under-Hinging (Not Enough Wrist Set)
Golfers who do not hinge their wrists enough at the top lack lag, lose distance, and struggle to compress the ball. The Swing Hinge tells you when you have reached the correct amount of hinge. Over time, your body learns to set the wrists fully and naturally.
Over-Hinging (Too Much Wrist Set)
Too much hinge is just as damaging as too little. Over-hinging makes the swing floppy at the top, reduces control, and can lead to shanks and inconsistent contact. The Swing Hinge shows you when you have gone too far by missing the contact point, telling you to dial the hinge back.
Loss of Lag and Distance
Lag is created at the top. If your wrist hinge is insufficient or in the wrong position, lag never forms properly and you lose distance no matter how hard you swing. The Swing Hinge trains the exact wrist position that maximizes lag creation, adding distance without extra effort.
Inconsistent Backswing
When your wrist position changes from swing to swing, your club arrives at the top in a different position every time. The downswing becomes a guessing game. The Swing Hinge gives you the same checkpoint on every swing so your backswing becomes repeatable and your top position becomes consistent.
Poor Clubface Control
The angle of your wrist at the top directly controls the clubface angle through impact. A cupped wrist opens the face. An overly bowed wrist closes it. The Swing Hinge trains the neutral, properly hinged position that delivers a square face naturally.
Where to Use the Swing Hinge
At the Driving Range The range is the ideal place to train with the Swing Hinge. Clip it on during warm-up to verify your top position, then remove it and see if the correct hinge holds through your full session.
In Your Backyard You do not need to hit balls to benefit. Slow backswings to the top in your backyard with the Swing Hinge on the club build the correct wrist position through repetition. Feel the contact. Hold the top. Repeat. Five minutes a day is enough.
At Home Mirror work with the Swing Hinge is extremely effective. Swing slowly to the top and watch your wrist position while feeling the contact. The combination of seeing the position and feeling the feedback builds awareness faster than either one alone.
Before a Round Clip the Swing Hinge on during your pre-round warm-up. A few swings to the top with accurate feedback sets your wrist position for the round. Then remove it before you play. Your body remembers the position from the warm-up.
When Something Feels Off Mid-Season Every golfer has stretches where the swing feels off and they cannot identify why. The Swing Hinge is the fastest diagnostic tool for the backswing. Clip it on, take a few swings, and find out immediately whether your wrist position at the top has drifted. If it has, you found the problem. If it has not, you can rule out the top and look elsewhere.
Tips for Getting the Best Results From Your Swing Hinge
- Slow down at the top. The feedback happens at the top of the backswing. Give yourself time to feel it, especially in the first two weeks.
- Register every swing as contact or no contact. Keep a mental count. If 8 out of 10 swings make contact, your consistency is improving. Track your progress.
- Alternate on and off every 10 balls. This builds internal awareness so you can feel the correct top position without the device.
- Use it on multiple clubs. Your wrist hinge should be correct on every club, from wedge to driver. Train with the Swing Hinge on at least 3-4 different clubs per session.
- Combine it with slow-motion mirror work at home. Swing to the top slowly. See the position. Feel the contact. This 5-minute daily routine accelerates the learning dramatically.
- Use it as a diagnostic tool when your swing feels off. Clip it on, take a few swings, and find out immediately whether your top position has drifted. This saves hours of guessing.
- Clean and store properly. Wipe the device with a damp cloth after use. Store it in your golf bag where it will not get damaged.
Key Features of the Swing Hinge
Instant Feedback at the Top of the Backswing Contact means correct. No contact means incorrect. Simple, immediate, no ambiguity. You know on every swing whether your wrist position is right.
Fixes the Root Cause, Not the Symptoms Most training aids give feedback at impact. By then, the damage is done. The Swing Hinge gives feedback at the top, where the swing is decided. Fix the top and the rest follows.
Trains Proper Wrist Hinge for Lag and Power The correct wrist set at the top is what creates lag. More lag means more speed delivered at impact. The Swing Hinge trains the exact position that maximizes lag without over-hinging.
Clips Onto Any Club Works with wedges, irons, hybrids, and woods. One device for every club in the bag.
No Swing Changes Required The Swing Hinge works within your existing swing. It does not change your grip, setup, or motion. It simply tells you whether your wrist position at the top is correct.
Lightweight and Portable Small enough to keep in your golf bag. Clips on and off in seconds. Use it anywhere.
Works for Every Golfer Beginners building their backswing for the first time. Advanced golfers fine-tuning their top position. Any golfer who wants a consistent, correct wrist hinge at the top of their swing.
Frequently Asked Questions About the Swing Hinge
How long until I see results? Most golfers feel the correct top position within the first session. Consistent improvement in ball flight typically happens within 1-2 weeks of regular use. Permanent muscle memory for the correct wrist hinge builds over 3-4 weeks.
Does it force my wrist into the correct position? No. The Swing Hinge gives you feedback by contacting your wrist when the position is correct. It does not force anything. You learn to find and repeat the correct position yourself, which is what makes the improvement permanent.
Can I use it with any club? Yes. The Swing Hinge clips onto any club in your bag. Train with wedges, irons, and driver for complete consistency across every club.
Does it work for left-handed golfers? Yes. The device is fully adjustable and works for both right-handed and left-handed golfers.
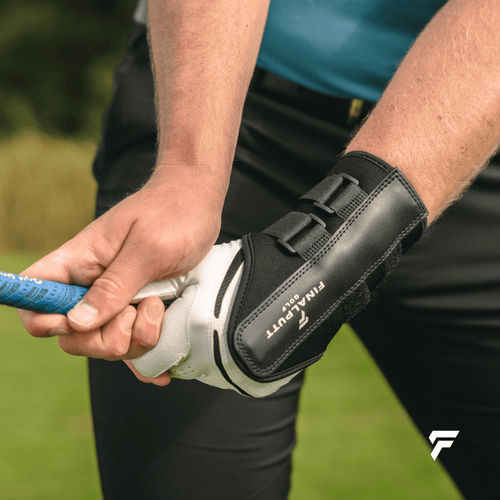
How is this different from the Wrist Trainer Pro? The Wrist Trainer Pro is a wearable brace that keeps your wrist flat and stable through impact, preventing flipping and cupping. The Swing Hinge clips onto the club and gives you feedback specifically on your wrist hinge angle at the top of the backswing. They train different checkpoints. The Swing Hinge trains the top position. The Wrist Trainer Pro trains the impact position. Many golfers use both.
Can beginners use it? Absolutely. Beginners benefit enormously because they are building their backswing from scratch. Training the correct top position from day one means they never develop the bad wrist habits that cause problems later.
Will it help me gain distance? Yes. A correct wrist hinge at the top is what creates lag. More lag means more speed at impact. Golfers who train with the Swing Hinge often gain distance simply because their lag improves, without swinging harder.
How do I clean it? Wipe with a damp cloth after use. Store in your golf bag where it will not get damaged.
Final Thoughts
The Swing Hinge is built on one powerful idea: the top decides everything. The position of your wrists at the top of your backswing determines your swing plane, your lag, your clubface angle, and your ball flight. Get the top right and the rest of the swing falls into place. Get it wrong and everything that follows is a compensation.
Most golfers have never received feedback on their wrist position at the top because it happens behind them and above them where they cannot see it. They guess. They hope. They rely on feel that may or may not be accurate. The Swing Hinge removes the guesswork. Contact means correct. No contact means adjust. It is the simplest, most direct feedback system in golf.
If you are tired of an inconsistent backswing, a weak top position, poor lag, and ball flight that changes from swing to swing, the Swing Hinge shows you exactly what is wrong and lets you fix it in real time. No batteries. No screens. Just a clip, a hinge, and the truth about your backswing.
With regular use, you will build a consistent, properly hinged top position that creates lag, controls the clubface, and sets up a powerful, repeatable downswing on every single swing.
Ready to fix your swing where it matters most? Add the Swing Hinge to your bag and find out what the top of your backswing has been doing all along.